No-Bake Chocolate Peanut Clusters: Your Go-To for Effortless Gifting and Snacking
In a world bustling with complex recipes and endless ingredient lists, there's something truly refreshing about a treat that delivers maximum flavor with minimal fuss. Enter the humble yet utterly irresistible chocolate peanut clusters. These delightful morsels are more than just a quick snack; they are a testament to the power of simple ingredients, transformed into something truly special. Perfect for satisfying a sweet tooth, whipping up a last-minute dessert, or crafting a thoughtful homemade gift, these no-bake wonders are about to become your new kitchen MVP.
Imagine biting into a perfectly balanced blend of salty crunch and smooth, melty chocolate – an experience that activates every single taste bud. This isn't just a recipe; it's an invitation to create joy, whether you're sharing it with loved ones or savoring every bite yourself. And the best part? No oven required, no complicated techniques, just pure, unadulterated deliciousness in minutes. It's the kind of recipe you'll return to again and again, especially when you need a fast snack fix or a homemade gift that always wows.
The Irresistible Allure of No-Bake Treats
Why are no-bake desserts so universally beloved? The answer lies in their sheer simplicity and efficiency. In our busy lives, the thought of an elaborate baking project can often be daunting. Chocolate peanut clusters bypass all those hurdles, offering a pathway to deliciousness that anyone can navigate, regardless of their culinary skill level.
- Speed: From pantry to plate in under an hour, including cooling time. They are the ultimate solution for unexpected guests or sudden cravings.
- Simplicity: No fancy equipment, no complex layering, no precise temperature control needed. Just melt, mix, and set.
- Accessibility: Perfect for involving children in the kitchen – melting chocolate (with adult supervision) and spooning clusters is a fun, easy task for little hands.
- No Oven, No Sweat: Ideal for hot summer days when you want a treat without heating up your kitchen, or when your oven is already occupied with other dishes during holiday seasons.
The beauty of these clusters is their ability to deliver a luxurious, satisfying experience with incredible ease. The salty crunch of peanuts paired with smooth chocolate hits the spot every time, making them a family favorite and a brilliant little present during the holidays.
Crafting Perfection: The Essential Ingredients for Stellar Chocolate Peanut Clusters
While the recipe boasts simplicity, the quality of your ingredients is paramount to elevating your chocolate peanut clusters from good to unforgettable. When you keep things simple, the individual components truly shine.
Choosing Your Chocolate Wisely
The chocolate forms the luscious base of your clusters, so don't skimp here. Good quality chocolate melts smoother, tastes richer, and sets with a more satisfying snap.
- Melting Wafers/Chips: These are often formulated to melt smoothly and easily, making them a fantastic, fuss-free choice. Brands like Ghirardelli or Guittard offer excellent melting properties and flavor.
- Chocolate Bars: If using a chocolate bar, chop it finely. This helps it melt more evenly and quickly, preventing scorching.
- Milk Chocolate: Offers a sweet, creamy, and classic flavor that many adore. It's often a hit with kids and those who prefer a less intense chocolate experience.
- Dark Chocolate (60-70% Cacao): Provides a richer, more sophisticated depth of flavor. It's less sweet and pairs wonderfully with the saltiness of the peanuts, creating a truly gourmet experience.
- Semi-Sweet Chocolate: A great middle-ground, offering a balance between the sweetness of milk chocolate and the intensity of dark chocolate.
- White Chocolate: While technically not chocolate (as it contains no cocoa solids), white chocolate melting wafers can add a delightful creamy sweetness or be used for marbling effects when combined with dark chocolate.
A personal tip: I often use either milk or dark chocolate depending on my mood; dark gives a richer depth while milk keeps it sweet and creamy. Experiment to find your perfect match!
The Peanut Powerhouse: Salted is Key!
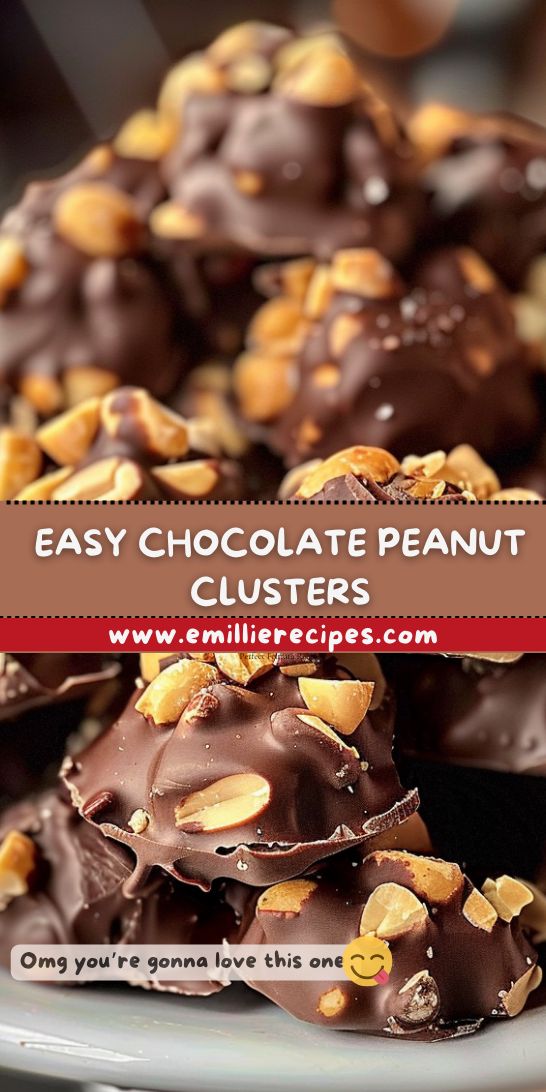
Peanuts are the star of the show, providing that essential crunch and a nutty aroma. For the best chocolate peanut clusters, always opt for good-quality, fresh peanuts.
- Salted Peanuts: This is my absolute secret weapon. The irresistible savory pop of salted peanuts perfectly balances the sweetness of the chocolate, creating that addictive sweet-and-salty dynamic that keeps you coming back for more. Dry-roasted, salted peanuts are ideal.
- Unsalted Peanuts: If you only have unsalted, you can still use them, but be sure to add a generous pinch of fine sea salt directly into your melted chocolate or sprinkle a few flakes on top of the clusters before they set.
- Freshness: Stale peanuts will lead to stale-tasting clusters. Ensure your peanuts are fresh and crunchy for the best results.
Beyond the Basics: Unleash Your Creativity with Customizations
This recipe is like a blank canvas, and I love making it my own depending on what I have in the pantry or the vibe I'm going for. You'll find plenty of ways to switch things up and still nail that perfect cluster every time. For an even deeper dive into creative variations, check out our article on Sweet & Salty Clusters: Endless Customization Ideas.
- Alternate Nuts & Seeds: When I’m feeling adventurous, swapping peanuts for almonds, cashews, pecans, or even walnuts brings a different texture and flavor that’s just as delicious. For friends with allergies, replacing peanuts with roasted sunflower seeds works surprisingly well, offering a similar crunch.
- Mix-ins for Extra Texture:
- Pretzels: Crushed pretzels add an extra layer of salty crunch and visual appeal.
- Dried Fruit: A handful of dried cranberries, cherries, or chopped apricots can introduce a delightful chewy texture and tangy sweetness.
- Shredded Coconut: Toasted coconut flakes add a tropical twist and nutty aroma.
- Mini Marshmallows: For a softer, gooey element.
- Toffee Bits: Adds a buttery, caramelized crunch.
- Flavor Boosters:
- Sea Salt Flakes: A light sprinkle of flaky sea salt on top of the still-wet clusters is a gourmet touch that enhances the chocolate flavor.
- Chili Flakes/Powder: For those who love a bit of heat, a tiny pinch of chili flakes or cayenne pepper in the melted chocolate is a game changer, adding a subtle warmth.
- Espresso Powder: Deepens the chocolate flavor without making it taste like coffee.
- Spices: A dash of cinnamon, nutmeg, or even a hint of cardamom can transform the clusters into an exotic treat.
- Extracts: A few drops of vanilla extract, almond extract, or peppermint extract stirred into the melted chocolate can add another layer of flavor.
- Visual Appeal: Mixing dark and white chocolate adds a fun marbled look and creates a sweeter cluster that kids adore. Sprinkles, especially during holidays, can make them extra festive.
Step-by-Step: Mastering Your Chocolate Peanut Clusters
Creating these no-bake wonders is incredibly straightforward, but a few key techniques will ensure perfect results every time. For even more detailed instructions, see our Easy Chocolate Peanut Clusters: Just Minutes to Make guide.
1. Melting Chocolate Like a Pro
The goal here is smooth, silky chocolate without scorching. Scorched chocolate becomes grainy and unusable.
- Microwave Method: Place your chocolate in a large, heat-safe bowl. Heat in 20-30 second bursts on medium power, stirring thoroughly after each interval. Stirring is crucial, as residual heat will continue to melt the chocolate even after it's out of the microwave. Stop heating once about 80% of the chocolate is melted, and stir until completely smooth.
- Double Boiler Method: If you prefer more control, a double boiler is ideal. Place your chocolate in a heat-safe bowl set over a saucepan of simmering water (ensure the bottom of the bowl does not touch the water). Stir frequently until melted and smooth. The gentle, indirect heat prevents burning.
Pro Tip: If you see any lumps or the chocolate starts smelling burnt, stop heating immediately. Remove it from the heat and stir vigorously; sometimes, you can save it by continuing to stir with residual heat. Avoid getting any water into your chocolate, as this can cause it to "seize," turning it into a thick, gritty paste.
2. The Perfect Mix: Incorporating Peanuts
Once your chocolate is perfectly melted and smooth, it's time to introduce the peanuts. Add all your salted peanuts to the melted chocolate. Using a large spoon or spatula, fold them in gently but thoroughly. The aim is for every single peanut to be generously coated with chocolate. This ensures your clusters hold together beautifully and taste perfect with every bite.
3. Forming & Setting Your Clusters
Preparation is key here to avoid sticking.
- Line Your Trays: Line two baking trays or large plates with parchment paper or wax paper. This prevents the clusters from sticking and makes for easy removal once set.
- Spoon & Shape: Spoon dollops of the chocolate peanut mixture onto the lined trays. The size is up to you – I usually aim for about 1.5 to 2 tablespoons per cluster. Gently press each cluster slightly with the back of your spoon to compact them a bit. Don't stress about perfect shapes – rustic is charming here. Depending on your dollop size, you should get around 25-30 clusters out of a typical batch.
- Cooling & Setting:
- Room Temperature: Allow the clusters to set at room temperature for about 1-2 hours. This creates a nicer snap and glossier finish for the chocolate.
- Refrigerator: If you're in a hurry, you can place the trays in the refrigerator for 20-30 minutes, or until firm. Be aware that chilling can sometimes cause a slight "bloom" (a dull, whitish film) on the chocolate, though it doesn't affect taste.
The Art of Gifting: Presenting Your Homemade Delights
Chocolate peanut clusters make brilliant little presents during the holidays or for any occasion. Their homemade charm and deliciousness speak volumes. Here’s how to make them an even more perfect gift:
- Elegant Packaging: Once fully set, arrange your clusters in small cellophane bags tied with ribbon, decorative tins, or festive treat boxes. Layering them with small pieces of parchment paper between layers can prevent sticking.
- Personal Touch: Add a handmade tag with the ingredients listed (useful for allergy awareness) and a simple "Made with Love" message.
- Holiday Themes: For seasonal gifts, use holiday-themed sprinkles or colored ribbons. Crushed candy canes can be added to the mixture for a festive peppermint crunch during winter.
Storage Tips for Freshness
To keep your chocolate peanut clusters tasting their best:
- Store them in an airtight container at room temperature for up to 1-2 weeks.
- In warmer climates, storing them in the refrigerator can prevent melting, but allow them to come to room temperature for optimal flavor and texture before serving.
Conclusion: Your New Favorite Homemade Treat
There you have it – a comprehensive guide to crafting the most delightful no-bake chocolate peanut clusters. From their unbeatable ease and versatility to their irresistible sweet-and-salty crunch, these clusters are truly a culinary gem. Whether you're seeking a quick snack, a crowd-pleasing dessert, or a heartfelt homemade gift, this recipe delivers on all fronts. Embrace the simplicity, experiment with the endless customization possibilities, and get ready to create something truly delicious. Your taste buds (and your lucky recipients) will thank you for it!
